Friday, March 14, 2014

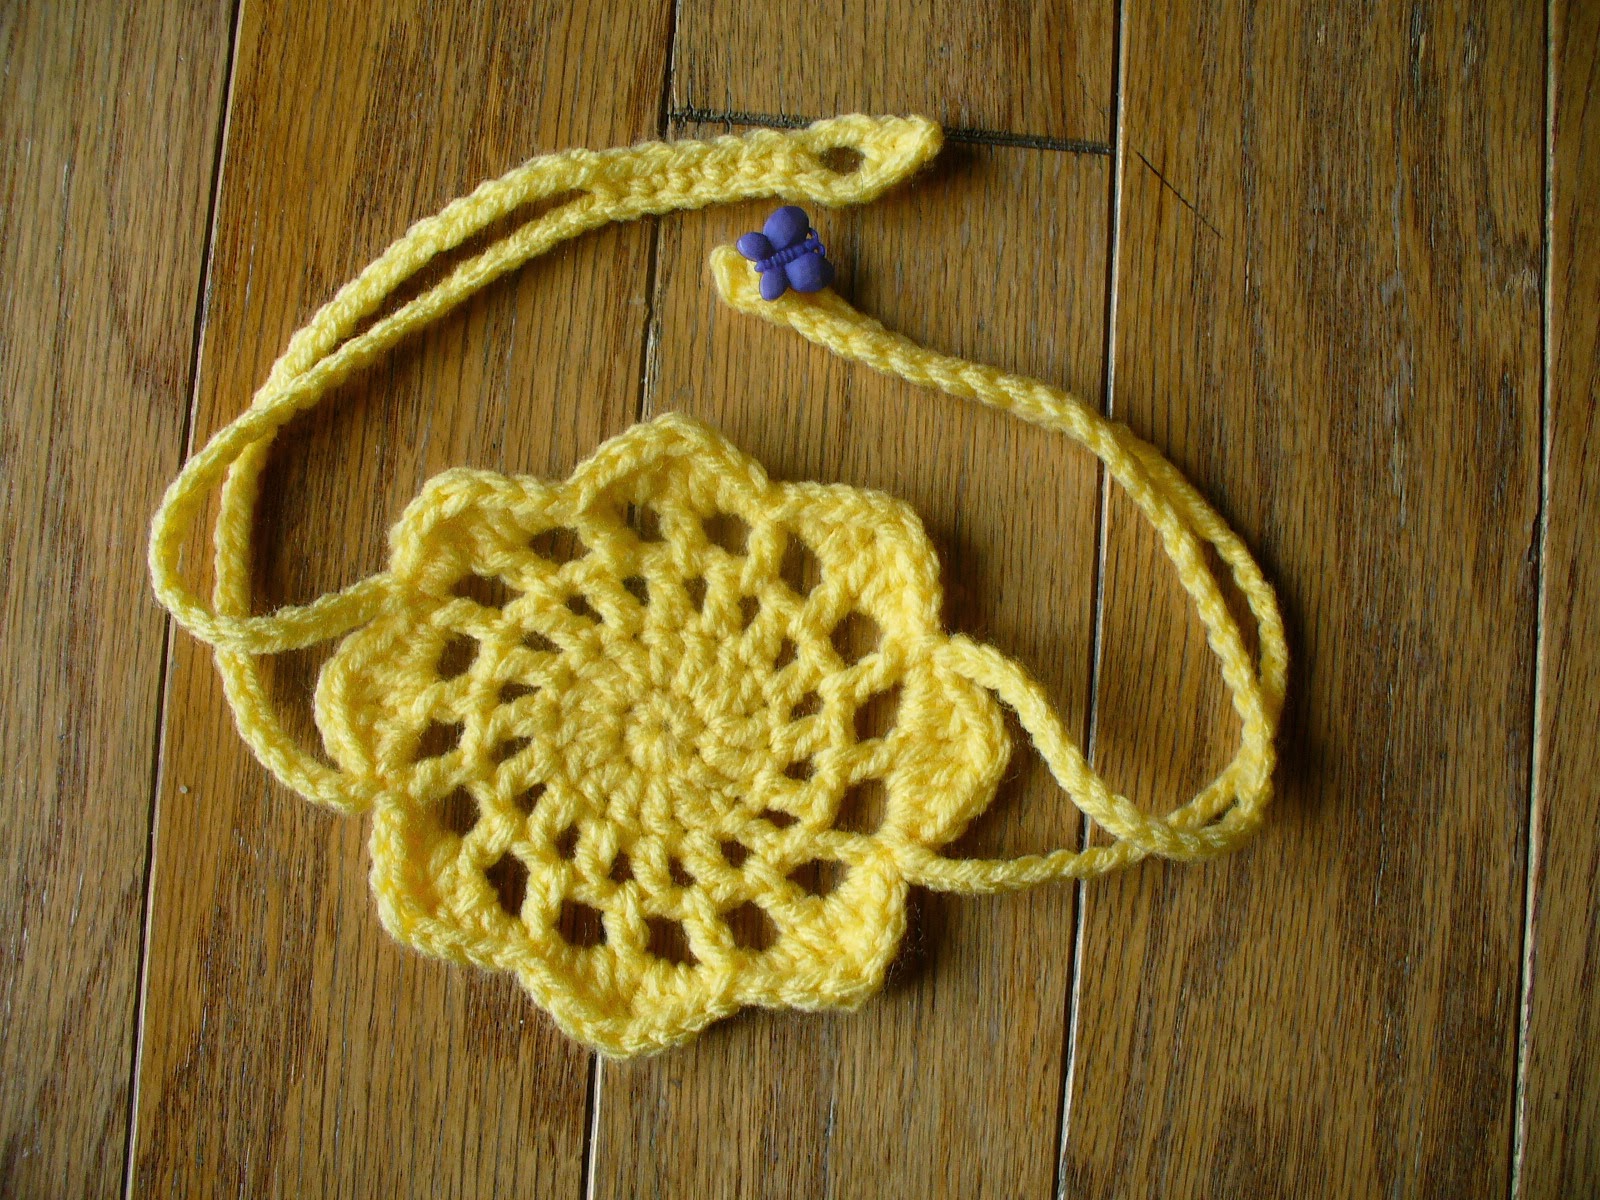
Sun Headband - Pattern

After posting about my headbands I decided to write up the pattern for the sun. Then I thought, hey, might as well post it.


Again I got the headband idea from Creative Yarns. I made my own design, modified the length for a toddler, and made it a button closure.


Materials:
worsted weight yarn (I used an acrylic yarn for this pattern, but I think cotton yarn is a better choice)
Hook G (4.00 mm)
button

Abbreviations:
ch - chain
st - stitch
sp - space
sl st - slip stitch
sk - skip
sc - single crochet
hdc - half double crochet
dc - double crochet
trc - treble crochet

ch 2
R1 - sc 8 in the first ch, sl st to first sc (8 sts)
        (You can also do these first two steps with a magic ring if that is your preference)
R2 - ch 2 (counts as first dc), dc in same sc, 2 dc in each sc around, sl st to 2nd ch of ch 2 (16 sts)
R3 - ch 3 (counts as first dc and ch 1), *dc, ch 1* in each dc around, sl st to 2nd ch of ch 3 (16sts, 16 ch 1 sp)
R4 - sl st in ch 1 sp, ch 4 (counts as first dc and ch 2), *dc, ch 2* in each ch 1 sp, sl st to 2nd ch of ch 4, (16 sts, 16 ch 2 sp)
R5 - sl st in ch 2 sp, *[sc, hdc, dc] in ch 2 sp, trc in dc of prev round, [dc, hdc, sc] in next ch 2 sp, sl st in next dc of prev round* repeat between * 7 more times, end with a sl st, do not fasten off (8 sun rays)

Straps
first side
from completion of motif, ch 38, turn, sc in 2nd ch from hook, sc 9, ch 27, sl st on other side of sun ray at sl st, fasten off


second side
count over 3 sun rays, join at sl st, ch 38, turn, sc in 2nd ch from hook, sc, ch 2, sk 2, sc 6, ch 27, sl st on other side of sun ray at sl st, fasten off.


Add button at third sc of first strap.

This headband measures 20 inches and fits my three and a half year old perfectly. If you need it to be larger or smaller add or decrease the chain length. Or if you aren't sure of size add a second button so it can be tighten if needed.


Read More »

Wednesday, March 12, 2014

Sun and Star Headbands


I had to take a little break from the Rainbow and Pansies. I can only work on something for so long before I start going a little crazy, which is why I haven't done a blanket before and tend to pick small projects that I can do in a day or two.


So I was cruising around on Ravelry looking at crochet jewelry (I have an idea brewing, but that is for later) and I found some really cute designs by Creative Yarn. So I headed over to her blog and looked at her patterns. I don't think she posted here anymore since the last post was over three years ago, but nonetheless she has cute patterns. I found one for a headband and thought it was adorable. It was meant for an adult, but I decided to modify it for my toddler.


First I have to say that C doesn't like wearing anything in her hair. Bows, barrettes, headbands, ponytails, they all stay for about five minutes and then are pulled out. So I wasn't optimistic for this to work but I had to try. I have to tame her curls a little.


I made the sun first, and talked it up. She actually wore it all day. I think that it was loose enough and soft that she didn't notice it in. It looked so cute in her hair I decided to make another one. C picked out a variegated pink yarn awhile ago so I thought I could do a heart with it. I found an awesome pattern at Cherry Heart for a Granny Heart but it was too big for a headband, at least with the cotton yarn I wanted to use. Here it is though. I might try it again with a lighter yarn


I looked some more at Cherry Heart because I like her patterns. I tried the Boho Hearts but smaller than I wanted. Then I found Twinkler Stars.


I made the bigger one first with cotton worsted yarn and an H hook. I liked the size and thought it would work well. Then C wanted it to be two stars. I made a second one with a G hook to make it a little smaller. I connected them with a slip stitch when I made the last point of the smaller star. Turns out she was right, super cute with two stars. Since it is a variegated yarn one side of the straps came out white, but oh well.


I decided that the cotton yarn works a little better. The sun was made with acrylic worsted weight yarn and after a day of wearing it stretches and gets a little loose.


Read More »

Friday, February 28, 2014

Rainbows and Pansies part 2

Just wanted to give an update on C's blanket. I got the cream color I wanted and have started making the squares for the pansies. I decided to go with a bobble stitch here too. The actual pattern is more of a traditional granny square. Again that is found over on Annoo's Crochet. But I thought I would go bobble all the way. I like the way it's looking.


It's going a lot faster than the spiral. Of course I'm only doing 6 inch squares and one color so that helps. Originally I was going to stitch them together into 12 inch squares, but I've decided to wait to see how I'm going to put the blanket together. If I don't do alternating spirals and pansies I might like the pansies to be 6 inches. Anyway, we'll see.

Here is a picture of all eight colors in the flowers.


Happy stitching!
Read More »

Saturday, February 22, 2014

Rainbows and Pansies

I feel like I have been seeing granny squares all over the place. I love granny squares but I don't have the endurance to make them then do something with them. I know this about myself. Really I do.

picture from P.S. I crochet

 Then I saw this awesome square pattern on P.S I crochet.

A granny spiral bobble square. I loved it. So what so I do? I ask C, look isn't this pretty, do you want mommy to make you a blanket? Of course!!


This is how the conversation went. What colors do you want? Red, orange, yellow, green, blue, and purple. Well, it just has four colors, what four colors do you want. Red, orange, yellow, green, blue, and purple. That's six colors. Yes. Let's pick four colors. But I want a rainbow blanket. Of course you do.

So, again, what do I do? Sure, C, I'll make you a rainbow blanket. And then what do I do? I decide that I'm going to make a twin size blanket for her bed that she doesn't even have yet. And since I do know myself and my, dare I say hatred, for stitching things together, I decided that if I made 12 inch squares I would be making less squares and therefore sewing less. 4 x 6 squares, so a 48 in x 72 in blanket. Only 24 squares, that's not bad.

That decision made I started on my squares. I added pink and lavender to C's color choices.


Then I realized, this is going to be a dizzy blanket. I thought about doing just solid colored squares, 12 spirals and 12 solids, but a flat square next to the bobble looked funny. I needed something with dimension. What goes with rainbows, flowers.

Back I went to blogs and searches. I found Annoo's Crochet World. So many flower granny squares. I finally decided on Spring Pansy.


Only that flower is too small to work on a 12 inch square. Dilemma. Okay, if I make four flowers that will work on a 12 inch square. Since each flower is two colors I can put all eight colors on one square to tie it all together. But that is 48 flowers. So much for my as little as possible thoughts.


I plan on putting the flowers on cream colored squares. Hopefully that will tone the rainbow down a little. I'm just waiting for a sale on yarn to get the color I want. They will be spread out, I just have them tied together so I can keep the colors organized.

I'll post again on this when I accomplish more. I hope I can get it done by the end of March so my grandma can help me organize the squares when I see her then.


Happy Stitching!


Read More »

Friday, February 21, 2014

Toddler Gladiator Sandal - Pattern

As promised, here is the pattern for the Toddler Gladiator Sandal. It took me awhile to work out the pattern to be understandable to others, but I think it's okay. I've added lots of pictures to help. If you have problems please let me know. I have made my standard two sizes for now, Toddler 9/10 and 11/12. I will try for a size 7/8 soon. I've started a new project and it's a big one, so I'm immersed in that at the moment (a post on that coming). Plus my nephews have asked for things so I need to get motivated to do those before I see them again next month. Good thing these are warm weather shoes so I have a little time.


Materials:
worsted weight yarn, two or three colors
Hooks - G (4.00mm) for sole, F (3.75mm) for body
six little buttons
Needle and thread

Abbreviations:
ch – chain
st – stitch
sl st – slip stitch
sk – skip
sc – single crochet
hdc – half double crochet
dc – double crochet
sc2tog – single crochet two stitches together
dc2tog – double crochet two stitches together
dc3tog – double crochet three stitch together

Notes:
This pattern is written for two sizes. First size measures about 6 ¼ inches or a toddler size 9/10, the larger size is in ( ) and measures about 7 inches or a toddler size 11/12. If there are no ( ) then it is the same for both sizes.

A double sole is optional, I like them because they add a little padding for toddlers. It also tends for make the sandals a little more solid and less flimsy.

Sole
Hook G
make four for double sole
with color A, ch 19 (23)
R1: 2 sc in 2nd ch from hook, sc 10 (12), hdc, dc 5 (7), 7 dc in last ch, working opposite side of ch, dc 5 (7), hdc, sc 10 (12), 2 sc in last ch, sl st to first sc – 43 (51) sts
R2: ch 1, sc, 2 sc, sc 15 (19), *hdc, 2 hdc* repeat x 4, hdc, sc 15 (19), 2 sc, sc, sl st to first sc – 49 (57) sts
R3: ch 1, 2 sc, sc, 2 sc, sc 17 (21), *hdc, 2 hdc* repeat x 2, 2 hdc, *2 hdc, hdc* repeat x 2, sc 17 (21), 2 sc, sc, 2 sc, sl st to first sc – 58 (66) sts
R4: ch 2, hdc, 2 hdc, hdc 21 (25), *hdc, 2 hdc* repeat x 3, *2 hdc, hdc* repeat x 3, hdc 21 (25), 2 hdc, hdc, sl st to first hdc, fasten off – 66 (74) sts

Flower Motif
make 2
change to Hook F
with color B, ch 4, sl st to form ring
R1: ch 1, 6 sc in ring, sl st to first dc
R2: ch 1, sc in same st, ch 3, *sc, ch 3* x 5, sl st to first sc (total of 6 sc  and 6 ch 3)
R3: sl st in ch 3 sp, *sc, hdc, dc, dc, hdc, sc* in ch 3 sp, repeat * in each ch 3 sp, sl st to first sc, fasten off (total 6 petals)
R4: join color A to any petal at first dc, ch 3 (counts at first dc), dc in same st, ch 3, 2 dc in next st, ch 2, sk 4, 2 dc, ch 3, 2 dc in next st, ch 2, sk 4, sl st 2, ch 2, sk 4, 2 dc, ch 3, 2 dc, ch 2, sk 4, 2 dc, ch 3, 2 dc, ch 2, sk 4, sl st 2, ch 2, sl st to ch 3
R5: sl st in next dc, sl st into ch 3 sp, ch 1, sc 2 in ch 3 sp, sc in each dc, sc 2 in ch 2 sp, sc in each dc, sc 2 in ch 3 sp, turn
R6 - R14: ch 1, sc 10, turn
R15: ch 1, sc 10, fasten off
left motif is front side, right motif is back side

notice the pink stitching showing on the back side

Heel/Back
Hook F
Left R1: looking at right side of sole, count 7 (8) sts back from seam (to the left), join, ch 1, sc in same st, sc 10 (12), turn 
stitch from red marker to blue marker

Right R1: looking at right side of sole, in 4th (5th) st from seam (to the right) join, ch 1, sc in same st, sc 10 (12), turn

stitch from red marker to blue marker

R2: ch 1, sc 11 (13), turn
R3 - R15: Repeat R2
R16: ch 1, sc 11 (13), ch 6 (7), sc to first st of motif's R15, sc 9, ch 10 (11), turn

first connect to motif

second ch of R16, which will connect to button

R17: sl st in 5th ch from hook, sl st around to end of heel piece, fasten off.

Ankle Straps
- on motif count 5 sc rows down and place markers on each side, count 4 rows down from first marker and place 2nd marker on side.
- on heel, count 5 sc rows down and place marker on connected side, count 4 rows down from first market and place 2nd marker


- on connected side, starting at top marker of heel, join, ch 6 (7), sl st in to motif at top marker (insert hook front to back), turn and sl st in each ch st, sl st into heel at same sp as join, fasten off
- Repeat at 2nd marker


- on button side, join at top marker, ch 10 (11), turn, sl st into 5th ch from hook, sl st in to each ch st, sl st in to same sp as join, fasten off.

- Repeat at 2nd marker

Toe
join in sp between bottom dc sts of motif on connected side of shoe, ch 3, sl st around post between 1st and 2nd sp over from R2 middle sp of sole (see picture below), turn, sl st in each ch st, sl st into same sp as join, fasten off.

Left shoe

Right shoe

Foot Straps
- on sole of shoe, place markers in 8th (10th), 12th (14th), and 16th (18th) st from heel section of each side


- on motif, place markers in sp between side dc sts and between dc of petal that has the sl st across the top.


-join on sole at first marker, ch 4, sl st into motif at first marker, turn, sl st in each ch st, sl st into same st as join, fasten off.
-Repeat on other side.


-Repeat for second and third markers, each side


Buttons
on heel sew on buttons at top row, 5th row down, and 9th row down so they match with the button straps. Easy way to find correct row is to find where straps connect to other side of heel and follow it over to button side. I sewed the button at the 2nd sc of the row.

Attaching the double sole
Pull all yarn ends through the bottom of the top sole.
Place wrong side of bottom sole against wrong side of top sole, making sure all ends are tucked between.
Sl st around between posts of hdc, fasten off.

(I haven't got a picture of this yet since I still haven't sprayed the non-slip on the bottom sole. I used the same color for the top and bottom sole and plan on using the accent color for the stitching.)

And voila, the sandal is done!


Hopefully it all made sense, but comment or send me an email if you need clarification.

This pattern is for personal use only. If you would like to sell a finished product, please credit me for the design. Happy Stitches!

Read More »

Monday, February 10, 2014

Toddler Gladiator Sandal Preview

While I was making the Two Strap Sandals, I also got the idea for this sandal in my head. I almost stopped making the first sandals because I was so excited about these.


I wanted something pretty and trendy. A few months ago I found a really cute pattern for a toddler fingerless glove that had a little flower motif on the back (if you are interested, the gloves are at crochetlatte). I really wanted to make them for C, but never did. So I thought why not make a little sandal with a fun, pretty motif on the top. I tried out a whole bunch, but decided to start with this little flower.


My husband thinks they are impractical, but really does that matter?


I'm not quite finished with the sandal because I would like to put a double sole on. I'm going to try out making it non-slip by using Plasti-dip. See here for a tutorial. You can find the colors at hardware stores like Home Depot and Lowes, but I didn't want to limit my colors that way. You can order clear online, but I just need to do it. Once I do I'll do a post on how it went.

Anyway, back to the sandal. Right now I've only made one size, hopefully I'll make another size, maybe two. I need to work on the pattern to make it clearer in some places. I love how it has come together. I think I'll try out some different motifs too. Hopefully I'll get the pattern up soon.

Read More »

Thursday, February 6, 2014

UPDATE - Toddler Double Sole Moccasin

Based on some questions I've had on the Toddler Double Sole Moccasin Pattern I added a couple more pictures to the ankle section. Hopefully that will help clarify. I also found a typo in the pattern in R11, I had too many decreased in the toe. It has been fixed.


I have been impressed with the number of people who have view the pattern. I'm glad so many people like it. I'm working on more toddler patterns for the summer.

Happy Stitches!
Read More »

Printfriendly